Deep learning is one of the most important advances in computer science in the last decade. Using trained deep neural networks, artificial intelligence (AI) inference algorithms can perform a variety of very useful tasks, such as image, speech, and facial recognition, natural language processing, image and video search, at unprecedented accuracy.
While inference can be done on the edge device, such as mobile phones or IoT sensors, it is suggested that cloud-based inference is much faster and energy efficient in our always-connected world. On a technical level, AI inference tasks apply a neural network model to some input data (eg. an image) and return an outcome (eg, the name of the object in the image). Those are perfect “serverless” functions, as they have simple input and output, are stateless, and should deliver consistent performance regardless of load. However, AI inference is also very computationally intensive. Cloud-based AI inference requires high performance serverless functions.
Rust allows us to write high performance AI inference functions. Those Rust functions can be compiled into WebAssembly bytecode for runtime safety, cross-platform portability, and capability-based security. Developers can then access those functions from an easy-to-use JavaScript API in the Node.js environment. In the getting started with Rust functions in Node.js, we showed you how to compile Rust functions into WebAssembly, and call them from Node.js applications.
In this example, we will demonstrate how to create a Tensorflow-based image recognition function in Rust, deploy it as WebAssembly, and use it from a Node.js app. We will use the open source Tract crate (i.e., Rust library), which supports both Tensorflow and ONNX inference models.
The example project source code is here.
Prerequisites
Check out the complete setup instructions for Rust functions in Node.js.
Rust function for image recognition
The following Rust functions perform the inference operations.
- The
infer()function takes raw bytes for an already-trained Tensorflow model from ImageNet, and an input image. - The
infer_impl()function resizes the image, applies the model to it, and returns the top matched label and probability. The label indicates an object the ImageNet model has been trained to recognize.
use wasm_bindgen::prelude::*;
use tract_tensorflow::prelude::*;
use std::io::Cursor;

#[wasm_bindgen]
pub fn infer(model_data: &[u8], image_data: &[u8]) -> String {
    let res: (f32, u32) = infer_impl (model_data, image_data, 224, 224).unwrap();
    return serde_json::to_string(&res).unwrap();
}

fn infer_impl (model_data: &[u8], image_data: &[u8], image_height: usize, image_width: usize) -> TractResult<(f32, u32)> {
    // load the model
    let mut model_data_mut = Cursor::new(model_data);
    let mut model = tract_tensorflow::tensorflow().model_for_read(&mut model_data_mut)?;
    model.set_input_fact(0, InferenceFact::dt_shape(f32::datum_type(), tvec!(1, image_height, image_width, 3)))?;
    // optimize the model and get an execution plan
    let model = model.into_optimized()?;
    let plan = SimplePlan::new(&model)?;

    // open image, resize it and make a Tensor out of it
    let image = image::load_from_memory(image_data).unwrap().to_rgb();
    let resized = image::imageops::resize(&image, image_height as u32, image_width as u32, ::image::imageops::FilterType::Triangle);
    let image: Tensor = tract_ndarray::Array4::from_shape_fn((1, image_height, image_width, 3), |(_, y, x, c)| {
        resized[(x as _, y as _)][c] as f32 / 255.0
    })
    .into();

    // run the plan on the input
    let result = plan.run(tvec!(image))?;

    // find and display the max value with its index
    let best = result[0]
        .to_array_view::<f32>()?
        .iter()
        .cloned()
        .zip(1..)
        .max_by(|a, b| a.0.partial_cmp(&b.0).unwrap());
    match best {
        Some(t) => Ok(t),
        None => Ok((0.0, 0)),
    }
}
Node.js CLI app
The JavaScript app reads the model and image files, and calls the Rust function.
const { infer } = require('../pkg/csdn_ai_demo_lib.js');

const fs = require('fs');
var data_model = fs.readFileSync("mobilenet_v2_1.4_224_frozen.pb");
var data_img_cat = fs.readFileSync("cat.png");
var data_img_hopper = fs.readFileSync("grace_hopper.jpg");

var result = JSON.parse( infer(data_model, data_img_hopper) );
console.log("Detected object id " + result[1] + " with probability " + result[0]);

var result = JSON.parse( infer(data_model, data_img_cat) );
console.log("Detected object id " + result[1] + " with probability " + result[0]);
Build and run
Next, build it with ssvmup, and then run the JavaScript file in Node.js.
$ ssvmup build
$ cd node
$ node test.js
Detected object id 654 with probability 0.3256046
Detected object id 284 with probability 0.27039126
You can look up the output detected object ID from the imagenet_slim_labels.txt file from ImageNet.
... ...
284 tiger cat
... ...
654 military uniform
... ...
Web application demo
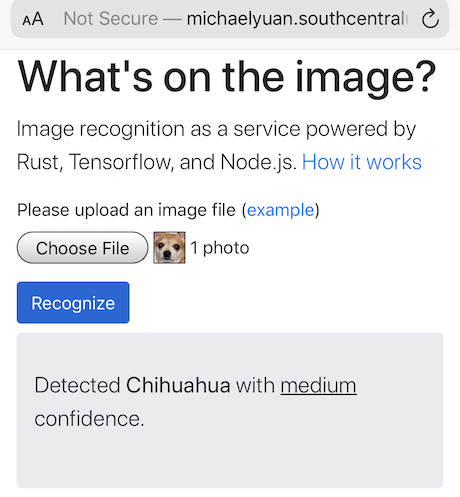
It is easy to take this one step further and create a web app user interface for the Rust function.

The following HTML file shows the web form for uploading an image. The jQuery ajaxForm function uploads the image data to the /infer URL and writes any response into p element with id result on the page.
<html lang="en">
    ... ...

    <script>
    $(function() {
        var options = {
          target: '#result',
          url: "/infer",
          type: "post"
        };
        $('#infer').ajaxForm(options);
    });
    </script>
    ... ...

    <form id="infer" enctype="multipart/form-data">
        <div class="form-group">
		<label for="image_file">Please upload an image file (<a href="grace_hopper.jpg">example</a>)</label>
          <input type="file" class="form-control-file" id="image_file" name="image_file">
        </div>
        <button type="submit" class="btn btn-primary mb-2" id="recognize">Recognize</button>
    </form>

    <div class="jumbotron">
        <p id="result" class="lead"></p>
    </div>
</html>
The Node.js listner at the /infer endpoint receives the images data, calls the Rust function to recognize it, and returns the recognized result back to the web page for the result element.
app.post('/infer', function (req, res) {
  let image_file = req.files.image_file;
  var result = JSON.parse( infer(data_model, image_file.data, 224, 224) );

  var confidence = "low";
  if (result[0] > 0.75) {
    confidence = "very high";
  } else if (result[0] > 0.5) {
    confidence = "high";
  } else if (result[0] > 0.2) {
    confidence = "medium";
  }
  res.send("Detected <b>" + labels[result[1]-1] + "</b> with <u>" + confidence + "</u> confidence.")
})
Build and run the Node.js application.
$ ssvmup build
$ cd node
$ node server.js
You can now point your browser to http://localhost:8080 and upload an image to see for yourself!
